
Page updated: 20 February 2010
Making a hole in any part of a boat makes that point prone to leaks. On a SeaHawk there are certain areas of the superstructure that carry a further risk. These are those that are constructed using a balsa sandwich.
Other pages consider hull fittings and the most common source of leaks.
 Deck and Superstructure Fittings
The fittings shown below, added to the hatch and cabin door have been added to areas of a "sandwich" construction. Instead of being of solid resin, reinforced with glass fibre, these two mouldings contain a 10mm balsa wood infill encased in much thinner than normal inner layer of GRP.
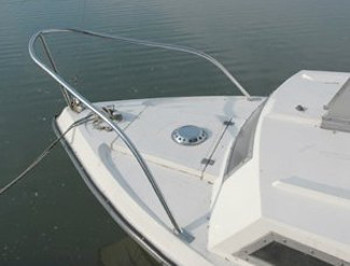
Besides the cabin door and fore hatch, the entire cabin roof is made of a balsa sandwich. To demonstrate the issue, the following [slightly edited] was posted by a Belgian subscriber to the old mail list (Now replace by The Forum).
"I bought my SeaHawk 'KIWI' last June. I'm a member of the local Sea scouts-group 'Lange Wapper' at the shores of the River Schelde and KIWI was stationed in our hangar by her previous owner where she had been gathering dust for several years. After buying her I had to spend several weeks renewing the roof, including the wooden beam that supports it.
The wooden core between the two layers of polyester that form the roof had suffered greatly from incoming water (We didn't find the source) together with the beam. It had all rotted away and all that was left was some mushy stuff. We've replaced it with a pvc core and a brand new Iroco (sort of teak) beam, and lots of polyester. There were also two mushrooms on the rooftop that we took away because their inside wasn't sealed of properly and we didn't want to take the risk of later problems with incoming moisture again, so we just closed it up with epoxy, an expensive but solid replacement for polyester."
Any owner that has attempted to fit something on the cabin roof and drilled into it will confirm that there is indeed a wooden infill. In fact, look carefully at the ceiling inside the cabin and you may see how, at the very edges, it rises slightly before falling away down the sides. (See a picture on the Description page.) This is true both of the four berth type, that has the roof beam described by Iwan and the two berth model that only has the square pad supporting the mast and thinner braces rising from the bulkheads.
If any of these panels are penetrated by water, the wood rots to a pulp leaving a unit with much less strength than intended. This may not matter too much in the cabin door, but loss of strength in the hatch, which may frequently be stood on, is more of a danger. As for the cabin roof, which also supports the mast.... the results would be devastating.
Repair

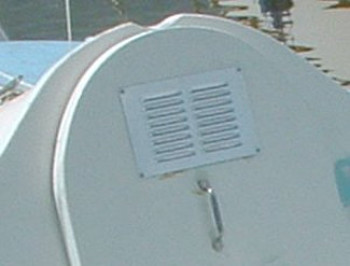
Here is an example of what can happen to a door with a large hole cut into it. Water has seeped into the wooden core where the vent has been cut into the panel. Once in the core, the water will slowly fill the entire panel. Towards the bottom left, it can be seen that some osmosis has taken place and water has seeped directly through the glass fibre. Higher up, there are rust stains where water has flowed out of the panel through the screw holes securing the lower handle. In the close up it can be seen that there is lichen growing on the remains of any wood, but the original blue of the outer skin of the door panel shows where no wood remains. It was possible, on this door, to insert a 20cm screwdriver blade and not feel any resistance in some directions.

The first thing to be done was empty the water. All the fittings were removed from the door and holes were drilled through the inner skin at the bottom corners of each side of the panel. Here, however, there was enough wood left to be acting as a sponge so not much water flowed out immediately. However, as can be seen, tipping the door upside down was a different matter.
The door was left to dry out for a spell. The ultimate repair would have required the cutting away the whole of the inner skin, replacing the wood and then applying new glass fibre matting and resin to re-build it. However, as this is not a heavily stressed part of the boat it was decided to fill the core with expanding foam. While this would not replace quite the level of strength as the original wood, it was likely to be adequate. It would always be possible to undertake that "ultimate" repair at any time in the future. One advantage of using a can of expanding foam spray is that the curing process of the foam requires moisture, so the technique should actually help with the drying out process.

Foam was sprayed into the gap and, as it was going off trimmed to shape. The bottom edge was trimmed at an angle designed to retain a slope toward the outer face when the door was hung in its normal position. Once the foam was fully cured Plastic Padding filler was used to reinforce the foam, provide a firm edge and seal the gap between the two faces of the door. As a further preventive measure the raw edges were then lined Duck Tape. The picture shows the first two guide holes drilled for the replacement grill, and the first of three lines of non-setting putty which were applied to the door before the new grill was fixed in place. The bottom edge was left unsealed to allow any water that did get blown in between the vanes of the grill a way to escape.

The final aspect of the repair, before the inside of the door was repainted, was the replacement of the upper door handle with a nickel alloy one, to avoid any further risk of rusting. As the door catch was showing signs of age this was also replaced. Because the new catch required a fresh configuration of holes for its mounting bolts as small panel of plywood, varnished on both sides and the edges, was used to reinforce this area.
Several weeks later, moisture was still escaping from the two holes drilled in the at the bottom of the double skinned area of the door, but this was easy to wipe clean.
Footnote: The small wooden panel at the base of this particular cabin door, was veneered MDF and intended to strengthen the area which had had a number of different hasps fitted over the years. By the end of the season in which the repair was made the veneer had peeled away and it looked quite unsightly. The door was then repaired more permanently, using glass fibre matting and resin and the old bolt holes filled, before being re-drilled for yet another hasp with yet another pattern of bolt holes.