
Page updated: 9 November 2011
 The Keel Plate
The steel keel plate that forms the lifting part of the keel on the SeaHawk is "L-shaped" and supported at the two extremities. At the forward end a substantial bolt acts as a pivot so that the keel can be retracted into the ballasted moulding in the hull. At the aft end it is supported on a steel strop.

The Keel Strop
In Reedcraft and Moore's built boats, the tip of the keel rises through the cabin threshold. In Pyecraft boats (below left) the keel had to be redesigned to meet the RCD regulations and it rises into the cockpit, not the cabin.


The strop itself is a simple length of multi-strand steel cable, one end of which is attached to the tip of the keel plate.
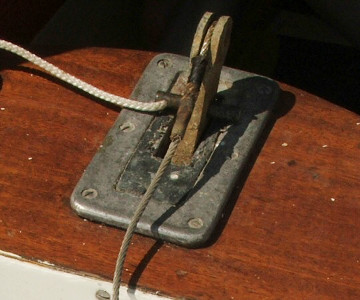
In early Reedcraft and Pyecraft boats the keel is secured in the raised position by ensuring a ferrule on the strop is held above a narrowing in the slot through which the strop runs.
On late Reedcraft and Moore's boats one can slip a pin through a hole in the tip of the keel to hold it in the raised position. On early Reedcraft and Mistral Craft boats moving the cable into the narrow part of the slot will allow a ferrule to hold the keel in the raised, or partially raised, position. This is a quick and simple operation even when single handed, although at 70lb, it does require a bit of a heave.Early Reedcraft
Examples vary slightly, but all are relatively crude. A plate on the cabin threshold includes a narrow slot to the rear of the main aperture. When the keel is lifted, the cable is pulled backwards and a ferrule on the strop is used as a stop within the narrow slot to prevent the keel dropping again. The example below, on the left, is a faithful copy, including the builders mark, made when the owner restored his boat.
The length of strop with this type of handle has been measured on several boats at 16". In the example below on the right, the owner had additional ferrules placed on the strop to allow the keel to be partially lowered.


Late Reedcraft and Moores
The cast aluminium handle is fitted the majority of the fleet. It locates in a matching socket incorporating a rubber seal, mounted on the cabin threshold step. The length of strop with this type of handle has been measured on several boats at 14". With this type, each end of the cable is spliced into a loop. These are then held in place by a simple countersunk bolt passing through a slot in tip of the keel and the handle.

Pyecraft
The strop and handle show signs of a return to the cruder early Reedcraft design but now additional ferrules are fitted as standard with the advantage of being able to raise the keel partially.

Note that with this design the keel is locked up by pushing the cable forward towards the cabin, not aft, as on the original design. The ferrule is then held in position by a ridge in the socket plate.
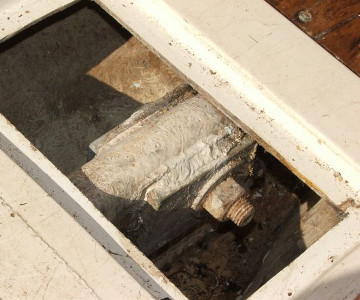
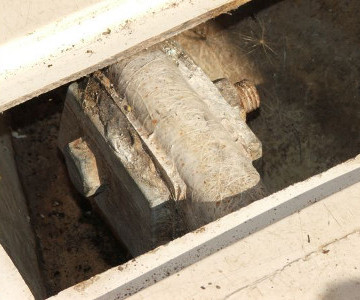
The Pivot Bolt
One reads reports about some boats where the hinge pin on a keel fails. However, no one has yet reported such a problem with a SeaHawk. Below are pictures of of a typical keel bolt, in situ. On the left the bolt is viewed from starboard showing the nut and washer. On the right the bolt head can be seen. Both pictures showing the substantial plates through which the bolt passes that reinforce and prevent wear to the pivot.
In the Owners section there is a report of the replacement of a Keel Bolt.
Rudder

The standard rudder hangs on pintles on the transom. It is not designed to lift as the fixed part of the keel draws more than the rudder so, when afloat, the keel will always touch the bottom first. However, it does mean it is important to fit the rudder after the boat is launched from a slipway and before it is to be recovered.
Essentially, it is made of three planks of one inch thick mahogany. The central plank forms the blade of the rudder and is in two parts creating a socket near to the top through which the tiller is passed. The tiller is then secured by a pin dropped through a hole as it protrudes all the way through the head of the rudder.
(The rudder shown here shows signs of a repair as, when new there should not be the bolts that can be seen in line with the lower gudgeon. Damage to the rudder blade through contact with an outboard propeller is also common.)